Last Updated on December 28, 2022 by Steve
To change domain can be scary to most people but it really shouldn’t be. For the most part the only thing you are doing is changing your old domain (yourolddomain.com) to your new domain (yournewdomain.com). The biggest fear and concern for most people is how to accomplish this without hurting SEO benefits like rankings, traffic, backlinks etc. through the process. These are valid concerns, if not handled correctly the migration can harm your business.
I’ve moved many sites over the years using WordPress so I though I would share this knowledge and put it in this easy to understand, thorough guide. If you decide to get a hosting packing from us at Best WordPress Solutions I will personally migrate your site from your current host if you need that service.
Why You May Need to Change Domain
There are many reasons why someone might need to change domain but most common reasons are:
- You are rebranding your business and got a new domain name to go with it.
- Maybe you were using a top level domain such as .NET or .Me and you now finally got a really popular TLD like a .Com for your business.
- You are combining multiple properties into a single domain
- You need to start from scratch and ditch your old domain because your site is suffering from a penalty.
Important things to Remember to Change Domain
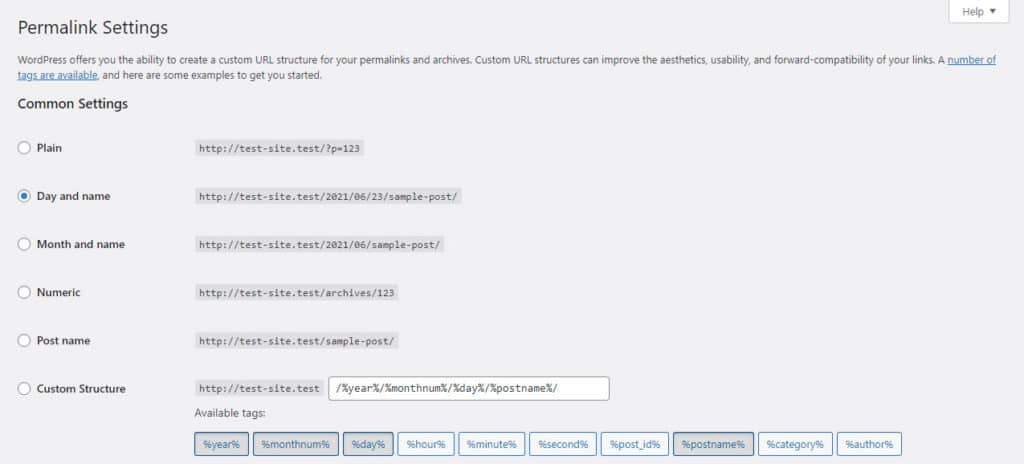
URL/Permalink Structure
Its recommended to keep the same URL structure. For example yourolddomain.com/about-us/ to yournewdomain.com/about-us/. You can change both your domain name and permalink structure at the same time but I would advise making the least amount of change at one time to play it safe and reduce complication. Changing your domain name is a big enough change on its own.
If your old site isn’t using pretty permalinks I would recommend waiting about 6 months after you change domain before changing the permalink structure.
HTTPS
You should migrate to HTTPS if you are using HTTP on your current site and this is the perfect time to make that change. HTTPS benefits include encryption, better referral data, performance improvements with HTTP/2 and improved SEO rankings. You also will not get those unsafe warnings visitors get from the browser when visiting non HTTPS site. HTTP sites are not secure.
While you are changing domain names you can easily migrate to HTTPS.
Indexing and Crawling
You may see a slight dip in traffic temporarily when you change domain of your WordPress site, this is normal. It will take google a few weeks to crawl your new URLs and re-index.
How to Change Domain of Your WordPress Site
Step 1 – Back up Current WordPress Site Before You Change Domain
This is the first step in changing domains. Backing up ensures if something goes wrong you an always revert back.
Option 1 – One Click Backup using cPanel
If you are a Best WordPress Solutions customer you most likely have cPanel as the control panel for your hosting package. cPanel is the dominant control panel for web hosting as of the time of this posting. cPanel is configured to automatically back up your site daily. If you need to manually trigger a backup or restoration then please read our guide on backing up and our guide on restoring your site using cPanel if you need further details on the process.

Option 2 – Backup Your Site Using a WordPress Plugin
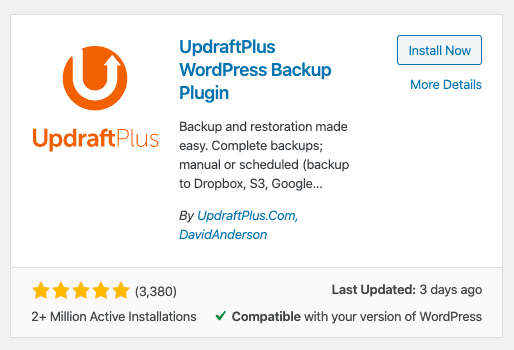
A third party plugin can be used and here are a few of the most popular which can get the job done:
Be sure to get a backup plugin that provides incremental backups. Incremental feature decreases server load , disc space and improves reliability.
I am a big fan of UpdraftPlus. Their premium version has backup, clone and migration capabilities. If you would like to learn how to use this plugin please check out our complete guide on backing up WordPress using UpdraftPlus. By the way UpdraftPlus Premium is provided to all of our client sites!
Step 2 – Create a New Website, Update Existing Website Address
Now that you have safely backed up your website you can proceed to updating your WordPress URL and site address. There are several ways you can do this.
Option 1 – Create New Site/Account
This option involves creating am entirely new WordPress install with your new domain, then migrate website data over. After the fact you would then change your domain. Some might choose to use this approach because sometimes people prefer to leave their old website intact for a while as another backup. Or maybe because you are moving to a new host as well.
In this case you would simply create a second website and use one of the backups we mentioned before to restore your site to this new domain. UpdraftPlus Migrator would work well for this or you can upload a backup set to the new domain., that would work also.
Option 2 – Clone Site
You have the option of cloning your existing WordPress site to another if your webhost offers that capability. My company Best WordPress Solutions has Softaculous installed on all of our cPanel powered servers. Among the many features Softaculous offers is the ability to clone WordPress sites.
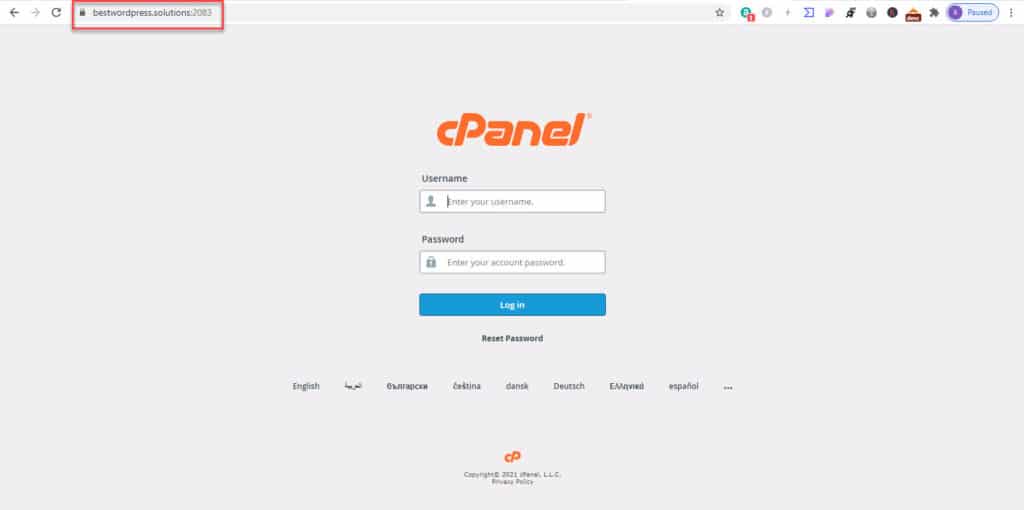
To use Softaculous start by logging into cPanel:
e.g. cPanel’s URL will be https://domain.com:2083 and login with your details
Click on the Softaculous Icon or link
![]()
Click on the Up To Date button for the WordPress Install you wish to clone
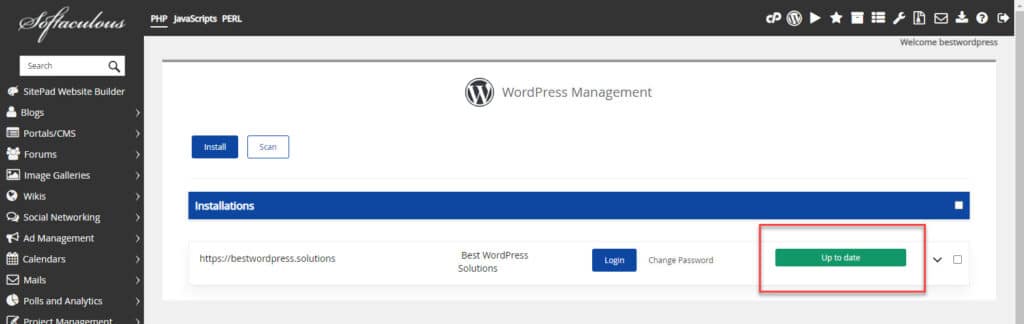
Now click on the Clone Button
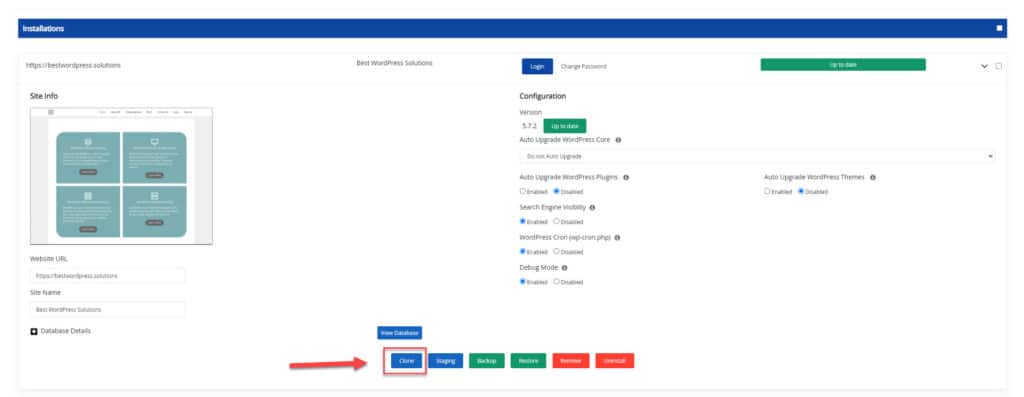
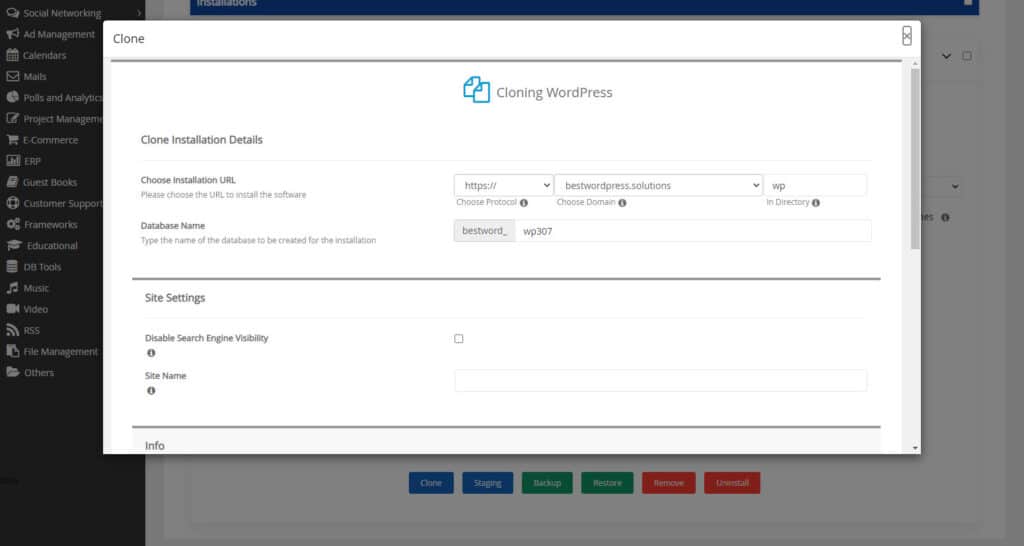
The Clone page will appear with the current installation details and a form to fill in the details for the cloned installation
Fill in the Clone Installation Details
- Fill in the clone installation details i.e. Choose domain, Directory, Database name, etc
- Click on the Clone Installation button and this should do the trick. The time taken may vary in accordance to size of your installation, So please be patient.
- That’s it !! You can now use this cloned installation to test the updates or any other changes you may want to test.
NOTE : You will receive the clone installation details via email (if the emails are enabled).
NOTE : The admin/user account login details will be the same as the source installation.
Option 3 – Update Existing WordPress URL and Site Address
The final option would be to update your existing site’s WordPress URL and site address. Even if you created or cloned a new site above you would still have to follow these steps.
You can bring your whole WordPress site down if you mess up this step so be careful.
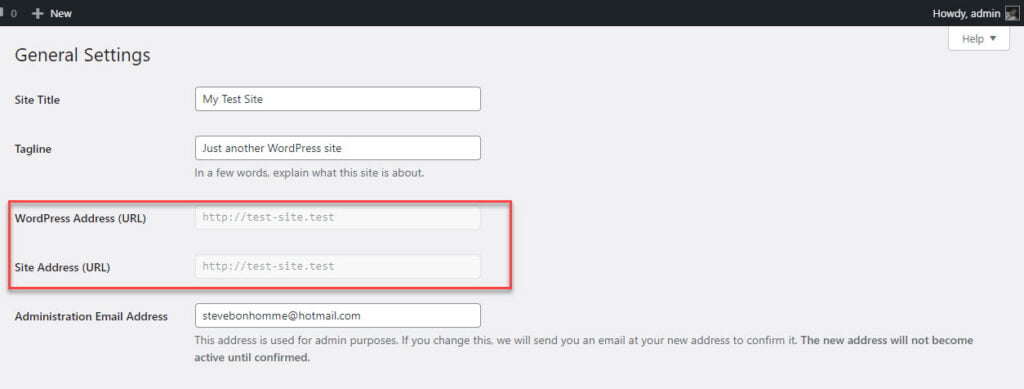
On the left-hand side, under “Settings,” click into “General.” You can then update the following:
- WordPress Address (URL): The address of your WordPress core files.
- Site Address (URL): The address to reach your blog.
They both should match unless you are putting WordPress in its own directory. After you press ‘Save Changes” you can only access the WordPress dashboard at the new domain name.
Step 3 – Update all Internal and Hardcoded Links
All your internal and hardcoded links must be updated now that your domain has changed. The links that must be changed include interlinks between content, media, links to JavaScript and CSS on your site.
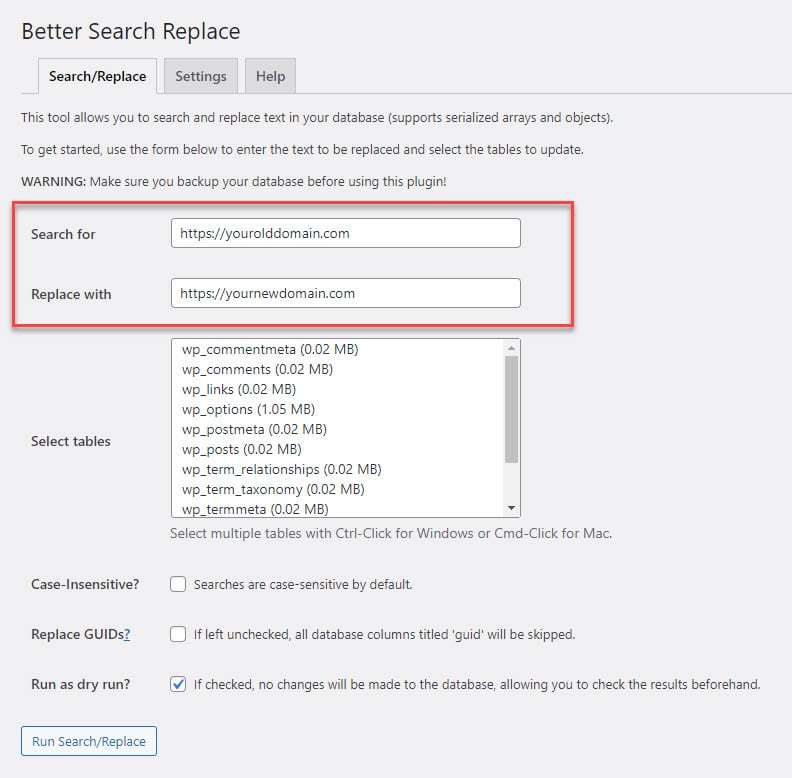
Update Links with a WordPress Plugin
Better Search and Replace by Delicious Brains can do this for you. Just install the plugin then enter the old domain and new domain and you’re all set.
You can also do a search and replace using the WP-CLI but that’s not for the average user. If you would like to know more about this option check out this guide.
Update Your CDN
If you are using a CDN with a CNAME, like cdn.yourdomain.com, you will want to run the steps shared above again, this time replacing your CDN URL. This is to fix hardcoded URLS that occur by accident or sometimes from copying and pasting.
Replace https://cdn.yourolddomian.com with https://yournewdomain.com
Most likely you will also need to add a new CNAME record to your DNS too for the new CDN since your domain changed.
Step 4 – Add 301 Redirects
This is by far one of the most important parts of change domain name, adding 301 redirects. By adding 301 redirect we ensure that all traffic from your old domain is automatically rerouted to your new domain.
301 redirects are important because:
- People backlink to your site over time. Google uses backlinks as a ranking signal. Links hold authority and if you suddenly loose them your site’s SEO can be seriously damaged and could take a long time to recover.
- Broken links aren’t good. You do not want someone clinking on a backlink and can’t reach your site.
- Social signals are also an important ranking factor. You don’t want people clinking on links from social media sites such as Facebook and Twitter which no longer work.
Not adding redirects will undoubtedly hurt your site.
You Should Leave Redirects Up Forever
After you change domain you should leave redirect up forever or at least for a long time. Its almost impossible to go back and update all of your backlinks manually. Unfortunately this means that you should keep renewing your old domain name forever as well.
Due to the fact that clients need to establish SSL connection to host before it sees redirect you will also need to keep SSL on your old domain as well to ensure 301 redirects work.
Below are directions on how to add 301 redirects. The redirects are done where your old domain is hosted but don’t worry, this doesn’t mean that you are forced to keep your old site/web hosting up and running. We will discuss how you can get rid of your old domain and or hosting a little bit later in this tutorial.
Option 1 – Redirects Added at Server Level
.htaccess file on Apache
If you are using Apache sever to host your WordPress site you can add the following rule to your old site’s .htaccess file. This file is usually found in the root of your site.
#Options +FollowSymLinks
RewriteEngine on
RewriteRule (.*) https://newdomain.com/$1 [R=301,L]
Nginx
If you are using Nginx to host your WordPress site you can add the following rule to your old site’s config file.
server {
server_name example.com;
return 301 $scheme://newdomain.com$request_uri;
}
Option 2 – Add 301 Wildcard Redirect With Cloudflare
The second way to get around the SSL 301 redirect issue is by using Cloudflare. By using this option you an add 301 redirects to your site for free even though there is no hosting associated with it, added bonus. This is a great way to add redirects without having to worry about keeping your old host running or the need to do any further configuration.
Any traffic that tries to access yourolddomain.com/blog will get redirected to yournewdomain.com/blog by using wildcard.
http://yourolddomain.com/ 301 redirects to https://yournewdomain.com
https://yourolddomain.com/ 301 redirects to https://yournewdomain.com
http://yourolddomain.com/* 301 redirects to https://yournewdomain.com/*
https://yourolddomain.com/* 301 redirects to https://yournewdomain.com/*
This configuration will ensure that all backlinks, HTTP and HTTPS versions do not break. This is important for SEO.
To configure URL forwarding or redirects:
- Log into your Cloudflare account.
- Click the appropriate Cloudflare account for the domain where you want to add URL forwarding.
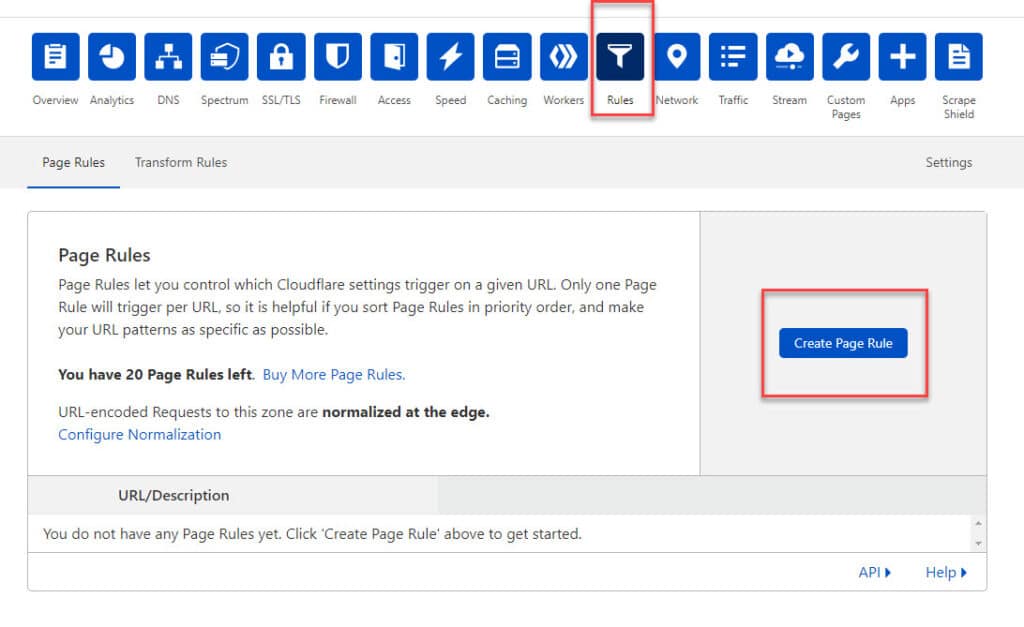
- Select Rules > Page Rules.
- Under Page Rules, click Create Page Rule. The Create Page Rule for <your domain> dialog opens.
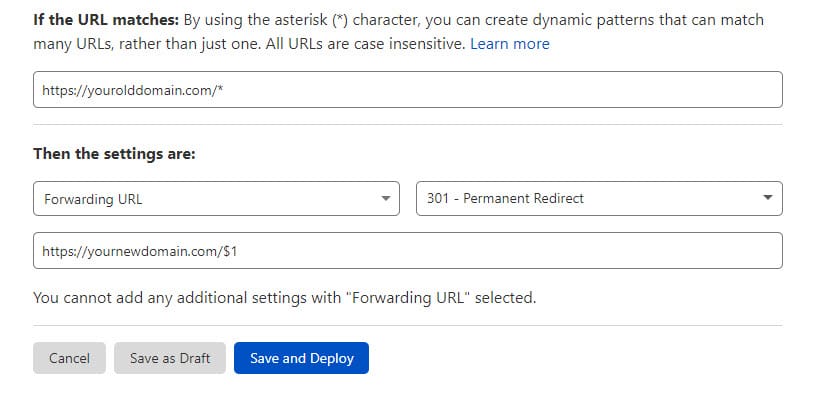
- Under If the URL matches, enter the URL or URL pattern that should match the rule.
- Next, click Add a Setting.
- Choose Forwarding URL from the drop down menu.
- Click Select Status Code and choose 301 (Permanent Redirect) or 302 (Temporary Redirect).
- Enter the destination URL.
- To finish, click Save and Deploy.
Make sure you choose “301 – Permanent Redirect” and that you use the correct syntax as shown below.
Double Check Redirects
Its a good idea to double check your redirects afterwards to make sure they are working correctly. Redirect Tracker is a free tool you can use for this purpose. Redirect Path is a free Chrome extension you can use also, comes in handy.
![]()
![]()
You should try testing different variations of your URLs to make sure all is good. If something is not working correctly you an contact your web host. If you are using us, Best WordPress Solutions, to host your site you may contact us by submitting support ticket and we can assist you. If you are not an existing customer consider trying out one of our WordPress Maintenance Plans or for one time issues, like configurating redirects, you can try our WordPress Troubleshooting Service. Our experts an take care of the entire change domain issue for you, quickly, professionally.
I must also note that you must make sure that you do not have too many redirects chained together, this can cause performance issues which will also in turn affect your SEO.
Step 6 – Update Google and Bing
At this point you already change domain and added redirects. You’ve also checked and made sure that redirects are working properly.
Now we have to update Google and Bing search engines. If you never created web properties for yourolddomain.com, create them now, verify them and repeat the steps for yournewdomain.com. After following the steps below you should have four properties in total between Google Search Console and Bing Webmaster tools (two old and two new)
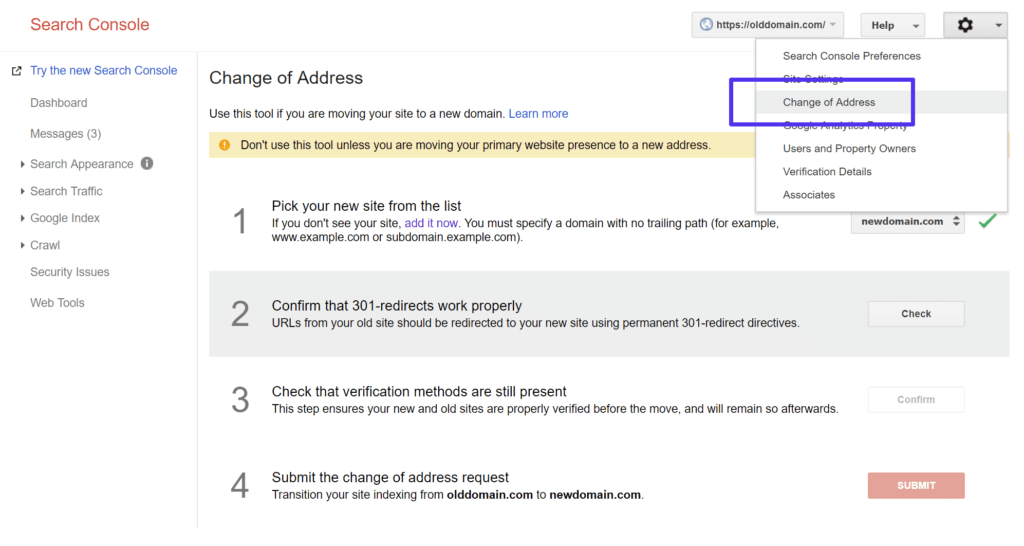
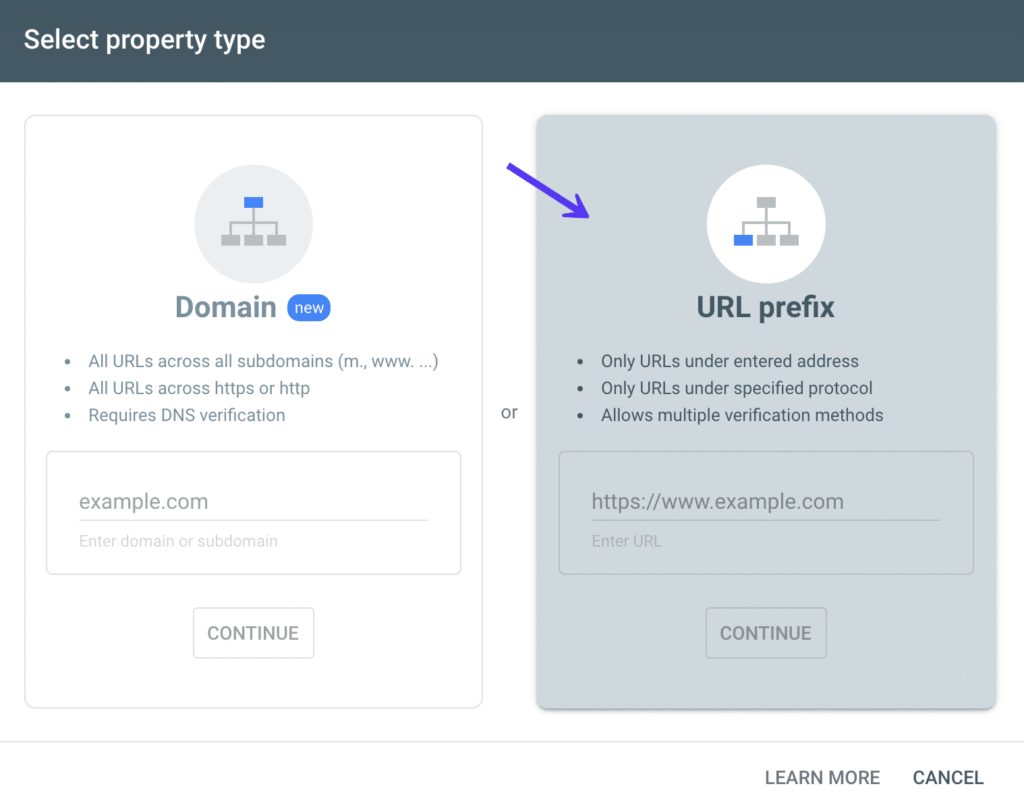
Change Domain Address in Google Search Console
This step is important because it lets Google know that everything is changing, you are using a new domain, so do not skip this step. You will need a verified property for both old and new domains.
Click your old domain’s profile, click on the gear icon in the upper right hand corner, select “Change of Address”, follow remaining prompts.
You can easily add your new domain using the “URL prefix” method in Google Search Console.
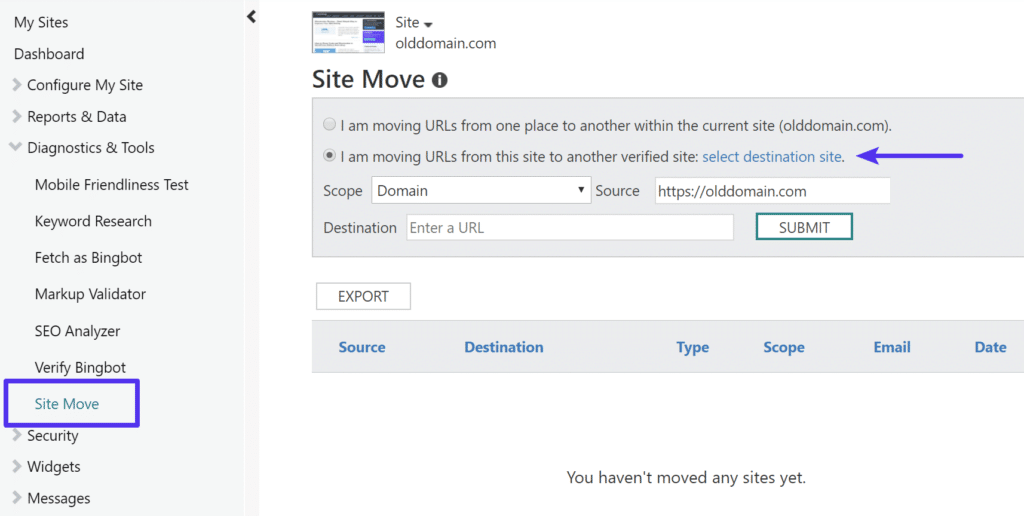
Change Domain Address in Bing Webmaster Tools
Bing Webmaster Tools has similar process like Google Search Console called “Site Move”. Once Again you will need verified property for both your old and new domains.
Simply click into your old domain’s profile, and click into “Diagnostics & Tools > Site Move.” Then choose the option to “move URLs from this site to another verified site.”
Step 6 – Submit Your New Sitemap Files
It is strongly recommended that you submit your new sitemap file now that you have verified web properties and notified search engines about your change domain. A sitemap, in case you don’t already know, is just a list of URLs that you want to be publicly available. Even though having a sitemap is not required it is recommended because it can help speed up the crawling and re-indexing process.
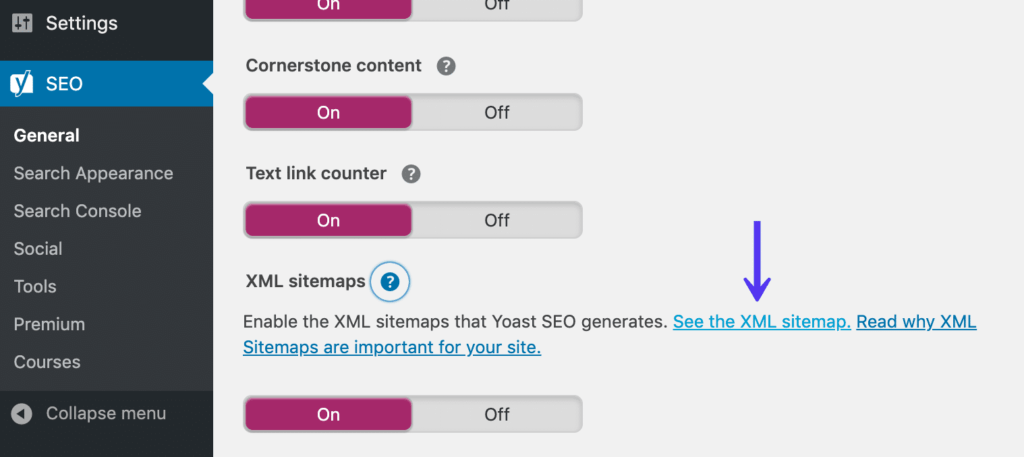
Users of the Yoast SEO plugin can find a link to the XML sitemap file under “SEO” → “General. Click into the “Features” tab and then on the question mark tooltip next to the XML sitemaps header. The URL should look something like this:
https://newdomain.com/sitemap_index.xml
To learn more about configuring Yoast and about more of its great features check out our Complete Guide on Yoast.
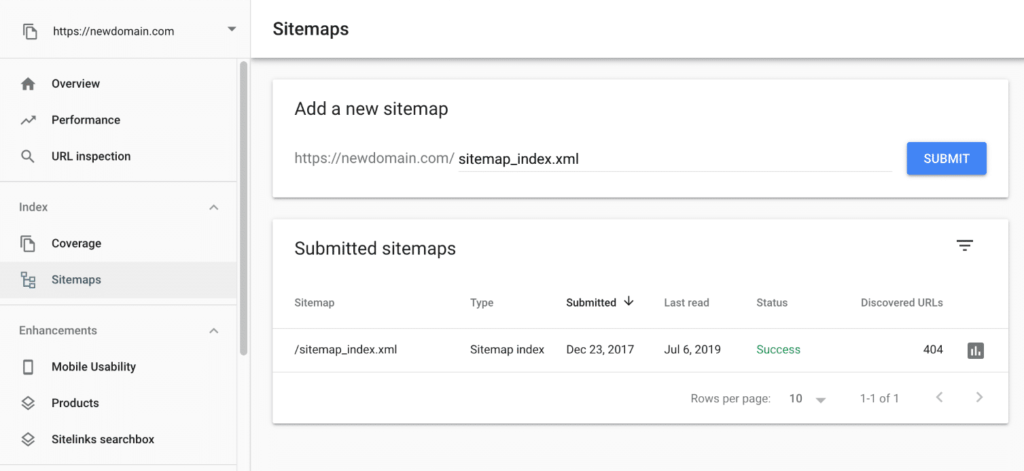
Submit Site Map to Google
You can submit your new sitemap, in Google Search Console, under “Index → Sitemaps.” Enter the URL that you got from Yoast SEO and click the ‘Submit” button.
Submit Sitemap to Bing
You can submit your new sitemap to Bing Webmaster Tools under Crawl > Sitemaps.” Click on “Add/Test Sitemap” and input the URL you got from Yoast SEO.

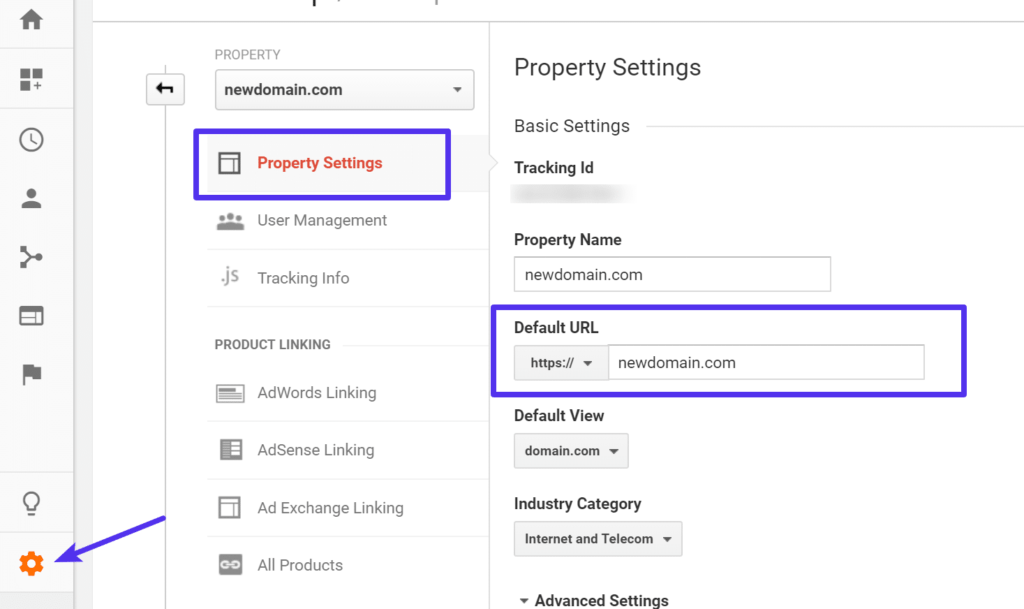
Step 7 – Update Google Search Console and Google Analytics
Next we have to update your Google Analytics profile. Google Analytics is the best free option you have to analyze traffic, patterns, and conversions on your site. If you are not using it you should be. The easiest way to do this is to click into “Admin,” go to your “Property Settings” and update the default URL.
It is recommended to change your existing property rather than creating a new one because this option makes it easier to compare history and traffic down the road, especially if you are keeping the same structure of your URL.
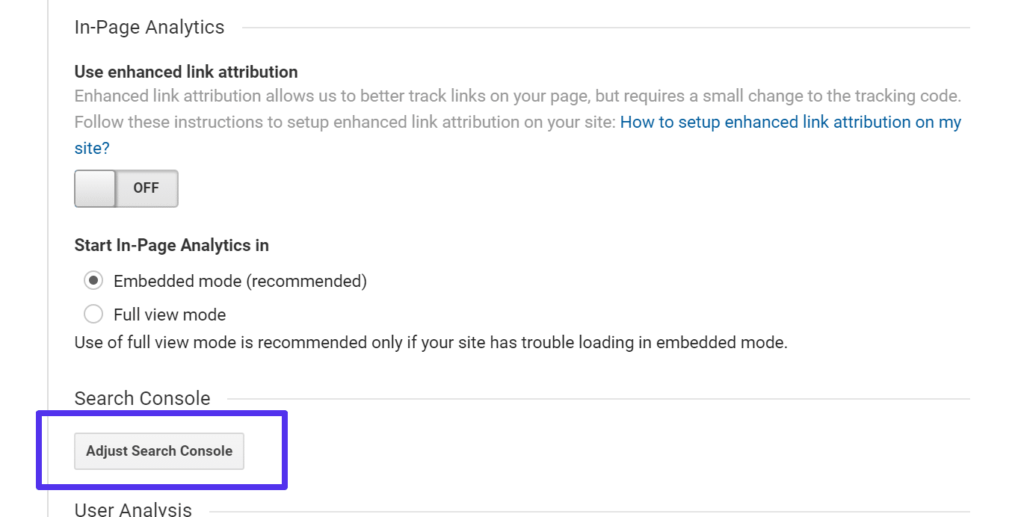
Reconnect Search Console
On the lower level of the same page you will also want to reconnect your Google Search Console profile to Google Analytics by simply clicking on “Adjust Search Console” and follow the steps. This allows for extra data to flow through into the “Acquisition > Search Console” section in Analytics, such as Landing pages, Countries, Devices, and Queries
Step 8 – Miscellaneous Post Change Domain Updates and Checks
Every week site is different. The use of different software and services is expected. That makes it difficult to predict unforeseen problems in configurations. Here is a list of the most common ones I’ve experienced.
- Check for changes or misconfigurations in the robot.txt file.
- If you are using Discuss you will need to migrate your Discus comments to new domain. If you need help doing this please fill out support ticket.
- If you are using a email marketing software such as Mail Chimp you will most likely need to update your domain as well as authenticate your domain again to the new domain.
- If you use social media you will have to update all links to Facebook Page, Twitter, Pinterest, Google+ etc.
- Update pay Per Click Ad URLs – AdWords, Bing Ads, AdRoll, Facebook Ads etc.
- If you are using any affiliate programs you will have to go through the re-approval process after updating your address.
- You have to monitor 404 errors after you change domain so that you can fix any broken links you might have missed. You can view these in Google Search Console under “Crawl > Crawl Errors” or utilize a third-party WordPress plugin such as Redirection which has 404 error reports.
Conclusion
There’s a few steps that goes into changing your WordPress domain. With a little preparation and guidance you can make sure that the change domain goes though smoothly, you keep your SEO benefits and your business is not harmed. Its expected to see a little dig in traffic so don’t worry when you do. Let me know your thoughts by feeling free to leave comment below.